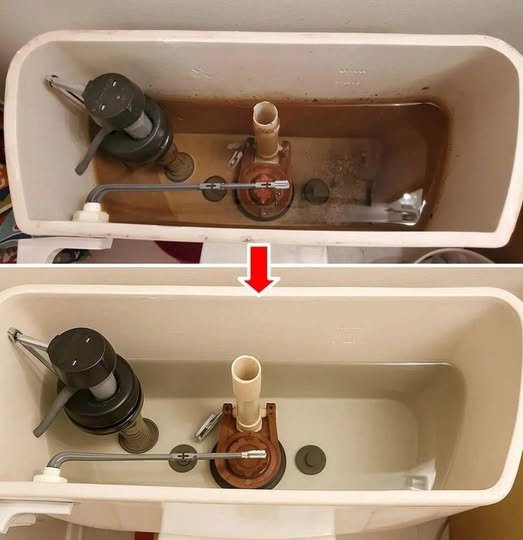
Learn how to clean your toilet flush, remove limescale and mineral buildup, eliminate grime, and make the flush area look fresh and new with simple cleaning steps.
How to Clean Your Toilet Flush and Make It Look Like New
The toilet bowl often gets most of the attention when cleaning, but the flush handle, flush button, rim, and surrounding areas can collect just as much dirt, mineral buildup, and bacteria.
Over time, hard-water deposits can leave white or yellowish marks around the flush mechanism, while fingerprints, soap residue, dust, and cleaning products can make the surface look dull.
Fortunately, you don’t need expensive products to give your toilet flush a cleaner, fresher appearance.
What You’ll Need
Before you begin, gather:
- Rubber gloves
- Microfiber cloths
- An old soft toothbrush
- Mild dish soap
- White vinegar
- Baking soda
- Warm water
- A small bowl or spray bottle
Important: Never mix vinegar with chlorine bleach or other incompatible cleaning chemicals. Dangerous fumes can result.
Step 1: Wipe Away Surface Dirt
Start by wiping the flush handle or button with a damp microfiber cloth.
Add a small amount of mild dish soap to warm water and use the solution to remove:
- Dust
- Fingerprints
- Grease
- Soap residue
- Everyday grime
For small grooves and edges, use a soft toothbrush.
Avoid using abrasive scouring pads that could scratch chrome, plastic, or other finishes.
Step 2: Deal With Hard-Water Deposits
If you notice chalky white or crusty buildup around the flush mechanism, hard water may be responsible.
Dampen a cloth with diluted white vinegar and place it over the affected area for several minutes.
The mild acidity of vinegar can help loosen mineral deposits.
Afterward, gently wipe the area clean with a damp cloth.
For stubborn deposits, repeat the process rather than aggressively scraping the surface.
Step 3: Clean Around the Flush Button
Toilet flush buttons can have tiny gaps where dirt and mineral deposits accumulate.
Use a soft toothbrush dipped in diluted soapy water to gently clean around the edges.
Don’t pour large amounts of liquid directly into the button or flush mechanism. Excess moisture can potentially enter areas where it doesn’t belong.
Instead, apply the cleaning solution to your cloth or brush.
Step 4: Clean the Flush Handle
For a traditional handle, wipe the entire surface, including the underside and the point where the handle enters the tank.
If mineral deposits have developed, use a little diluted vinegar on a cloth.
Allow it to sit briefly, then wipe and rinse with clean water.
Dry the surface thoroughly afterward.
Step 5: Don’t Forget the Tank Area
If your toilet has an exposed tank, dust and grime can collect around the top and sides.
Wipe the outside with a mild soapy solution and dry it with a clean microfiber cloth.
Avoid putting household cleaning chemicals directly inside the toilet tank unless the product is specifically designed for that purpose and compatible with your toilet.
Some harsh chemicals can damage rubber seals and internal components.
Step 6: Make the Surrounding Area Shine
Once the flush mechanism is clean, wipe the surrounding toilet surfaces.
Pay particular attention to:
- The top of the tank
- The area behind the flush handle
- The toilet seat hinges
- The base of the toilet
- Nearby walls or floor surfaces
Finish by drying everything with a clean microfiber cloth.
What About Baking Soda?
Baking soda can be useful as a gentle cleaning agent, particularly for certain odors and surface grime.
However, you don’t need to combine it with vinegar for every cleaning job. When mixed together, they react and largely neutralize each other’s chemical properties.
For mineral buildup, vinegar is generally more useful because its acidity helps dissolve mineral deposits.
How Often Should You Clean the Flush?
For a frequently used household bathroom, wiping the flush handle and surrounding surfaces at least once a week is a reasonable routine.
If multiple people use the bathroom or someone in the household is ill, you may want to clean high-touch surfaces more frequently.
A quick wipe takes much less effort than allowing grime and mineral buildup to accumulate for months.
Avoid These Common Mistakes
Don’t Use Harsh Abrasives
They can scratch the finish and make the surface look dull.
Don’t Pour Chemicals Into the Flush Mechanism
Cleaning products should be applied carefully to the exterior unless the manufacturer specifically recommends otherwise.
Don’t Mix Cleaning Chemicals
Never combine bleach with vinegar, ammonia, or other incompatible cleaners.
Don’t Scrape Aggressively
If mineral deposits don’t come away easily, soften them first and repeat the cleaning process.
A Simple Maintenance Trick
After cleaning the flush, wipe it dry.
Keeping the surface dry can reduce water spots and mineral deposits, particularly in areas with hard water.
You can also quickly wipe the flush handle whenever you’re already cleaning the bathroom. This takes only a few seconds and prevents buildup.
The Bottom Line
A dirty or crusty toilet flush can make an otherwise clean bathroom look neglected. Fortunately, mild soap, a microfiber cloth, a soft toothbrush, and diluted white vinegar can often make a noticeable difference.
Clean gently, avoid abrasive tools, protect the internal mechanism from excess liquid, and never mix incompatible cleaning chemicals.