Learn how to clean hob burners safely and effectively using simple household methods. Remove grease, burnt food, and stubborn residue while keeping your hob looking fresh and clean.
A dirty hob can make even a clean kitchen look untidy. After regular cooking, burners and grates can quickly collect grease, food splatters, oil, and burnt-on residue. If these deposits are left for too long, they can become difficult to remove and may even produce unpleasant smells when the hob is used again.
The good news is that you don’t need expensive cleaning products to give your hob burners a deep clean. With a few simple household supplies and the right technique, you can remove much of the buildup without spending hours scrubbing.
Before you begin, always make sure the hob is completely switched off and cool.
What You’ll Need
Gather the following items:
- Warm water
- Dishwashing liquid
- Baking soda
- White vinegar
- A soft sponge
- An old toothbrush or small cleaning brush
- Microfiber cloth
- Paper towel or dry cloth
- A non-abrasive scrubber
You may not need every item. For light dirt, warm soapy water may be enough.
Step 1: Let the Hob Cool Completely
Safety should always come first.
If you have just finished cooking, wait until the hob and burners are completely cool before cleaning them. Never pour cold water onto a hot surface because sudden temperature changes can potentially damage some materials.
Once everything is cool, remove any loose crumbs or food particles from the surface.
Step 2: Remove the Burner Parts
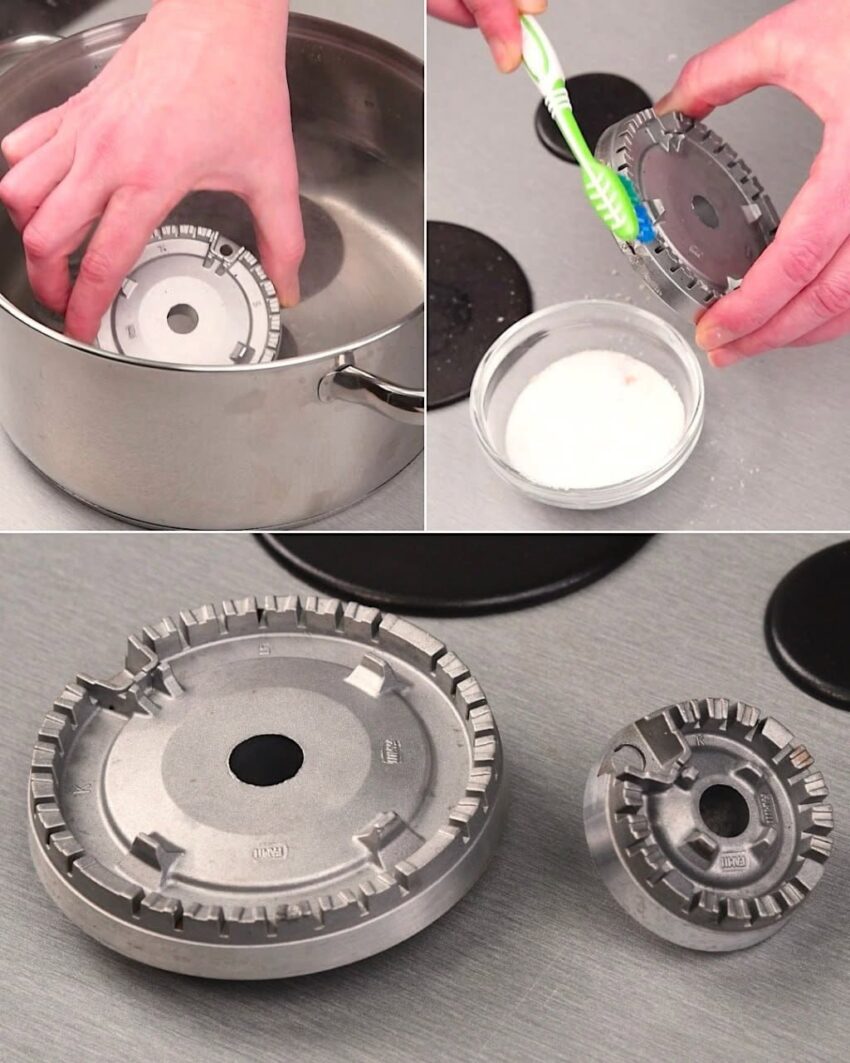
If your hob has removable burner caps, grates, or other removable components, carefully take them off.
Place the removable parts near the sink so you can clean them separately.
Avoid forcing anything that doesn’t easily come off. Different hob models have different designs, so it’s best to follow the manufacturer’s instructions for removing components.
Step 3: Soak the Removable Parts
Fill your sink or a suitable container with warm water and add a little dishwashing liquid.
Place the removable burner caps and other washable parts in the water and allow them to soak for around 15–30 minutes.
Soaking helps loosen grease and dried food, making the actual cleaning much easier.
For particularly greasy pieces, you can add a small amount of baking soda to the soapy water.
Step 4: Make a Baking Soda Paste
For stubborn burnt-on residue, make a simple paste using baking soda and a small amount of water.
The mixture should be thick enough to spread over the dirty area.
Apply the paste to greasy or burnt spots and leave it for approximately 10–15 minutes.
Baking soda can help loosen stubborn grime, allowing you to remove it with less scrubbing.
Step 5: Gently Scrub the Burner Parts
After soaking, use a soft sponge or an old toothbrush to clean the burner components.
Pay particular attention to areas where grease and food tend to collect.
For stubborn deposits, gently work the brush over the area rather than aggressively scraping it.
Avoid using steel wool or harsh abrasive materials unless your appliance manufacturer specifically says they are safe. Scratching the surface can make future cleaning more difficult.
Step 6: Clean Around the Burner Area
While the removable parts are soaking, clean the area around the burners.
Use a soft sponge dipped in warm soapy water to wipe away grease and food residue.
An old toothbrush can be useful for reaching small corners and edges.
Important:
Try not to allow excessive amounts of water or cleaning solution to enter burner openings, gas ports, or electrical components.
If you have a gas hob, don’t block or damage the small gas openings. They need to remain clear for the burner to operate properly.
Step 7: Use Vinegar for Greasy Residue
For remaining greasy film, you can lightly apply white vinegar to a cloth and wipe the affected surface.
Vinegar can help cut through some types of grease and residue.
However, don’t assume vinegar is safe for every hob surface. Some manufacturers recommend avoiding acidic cleaners on certain materials, so check your appliance’s care instructions first.
Never mix vinegar with bleach or other cleaning chemicals.
Step 8: Rinse the Removable Parts
Once the burner components are clean, rinse them thoroughly with clean water.
Make sure no soap or baking soda residue remains.
Then dry each part completely with a clean towel.
This step is particularly important for burner components because they should be completely dry before being put back into position.
Step 9: Dry Everything Properly
Don’t rush this step.
Allow the burner caps, grates, and other removable components to dry completely before reinstalling them.
Moisture left around burners can interfere with proper operation, depending on the appliance design.
Wipe the hob surface with a clean microfiber cloth until it is dry and streak-free.
Step 10: Put Everything Back Correctly
Once all components are completely dry, carefully return them to their original positions.
Make sure burner caps and other parts are seated correctly.
If something doesn’t seem to fit properly, don’t force it. Check your appliance manual to make sure the component has been positioned correctly.
How Often Should You Clean Hob Burners?
The answer depends on how frequently you cook.
For everyday cooking, wiping the hob surface after it has cooled can prevent grease and food from building up.
A more thorough cleaning of removable burner parts can be done weekly or as needed.
If you regularly cook foods that splatter oil or sauces, you may need to clean the hob more frequently.
How to Prevent Burnt-On Grease
Prevention can save you a lot of cleaning time.
Try these simple habits:
- Wipe spills once the hob has cooled.
- Don’t allow grease to sit for days.
- Clean food splashes as soon as it is safely possible.
- Avoid overfilling pots and pans.
- Keep burner openings clear.
- Give removable parts a regular wash.
- Dry components completely before putting them back.
A few minutes of maintenance after cooking can prevent a much bigger cleaning job later.
What Not to Do When Cleaning Hob Burners
There are a few mistakes worth avoiding.
Don’t Clean a Hot Hob
Always allow the appliance to cool first.
Don’t Pour Large Amounts of Water Over the Hob
Excess liquid can enter areas where it shouldn’t, particularly around electrical or gas components.
Don’t Use Aggressive Scrubbing
Harsh abrasive tools can scratch some surfaces.
Don’t Use Random Chemicals
Never mix cleaning chemicals. In particular, never combine bleach with vinegar or other acidic cleaners.
Don’t Ignore the Manufacturer’s Instructions
Different hobs have different materials and designs. Glass, stainless steel, enamel, ceramic, and other surfaces may require different cleaning methods.
A Simple Weekly Cleaning Routine
If you want to keep your hob looking clean without spending too much time on it, try this routine:
After cooking: Allow the hob to cool and wipe away visible spills.
Once a week: Remove washable burner parts and soak them in warm soapy water.
For stubborn buildup: Apply a suitable cleaning paste or manufacturer-approved cleaner and gently scrub.
After cleaning: Rinse, dry completely, and reinstall the parts correctly.
This simple routine can prevent grease from turning into thick, stubborn buildup.
Final Thoughts
Cleaning hob burners doesn’t have to be a difficult household chore. Warm water, dish soap, gentle scrubbing, and a little patience can remove much of the everyday grease and food residue.
The most important thing is to clean regularly rather than waiting until the buildup becomes severe. Always make sure the hob is switched off and completely cool, keep moisture away from electrical or gas components, and follow the manufacturer’s care instructions for your particular appliance.
With just a few minutes of regular maintenance, your hob can stay cleaner, look better, and be much easier to maintain.